
.jpg)
I've been extremely busy taking my guests to the North Fork
Yuba River where a wading staff is vital for navigating the river’s gnarly terrain
and banging the rocks to scare off the snakes. I've used many different kinds
in the past from old ski poles to the latest the fly fishing industry has to
offer. They work, but I wanted something hand crafted by myself that is both
bombproof and industrial. For $12 in new materials, a little time, and some
effort I created a no nonsense wading staff.
I took the best features of many wading staffs including Ron Hart’s
design (which is the best retail staff on the market in my opinion) and kept
the manufacturing simple. My work time was a bit longer since I made 4 staffs
so I can outfit my guests. For a single staff the work time is about 30 minutes,
not including drying time between steps. All of the materials were bought from Hills Flat Lumber Co., our local hardware store here in Grass Valley. Great store
by the way and the staff is so helpful!

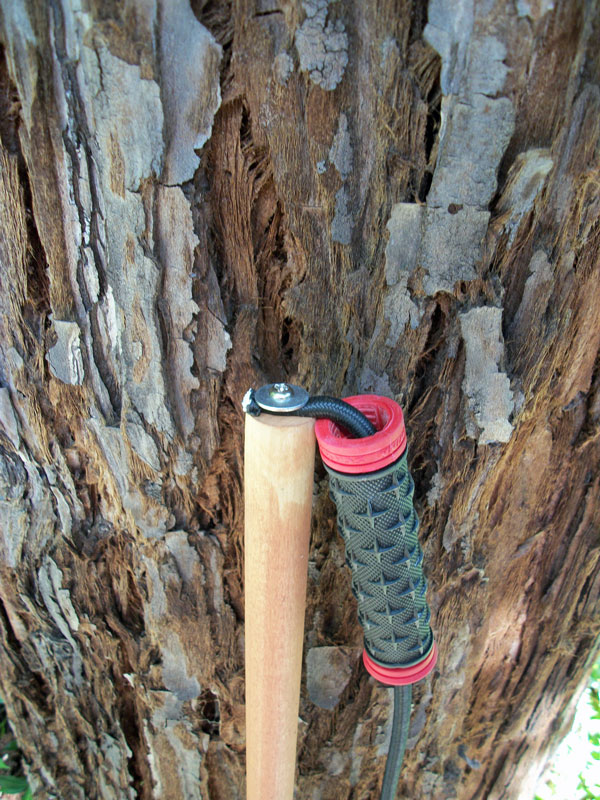
To make your own, first treat the 1”x 48” hardwood dowel with
some high quality stain. I skipped putting on a clear polyurethane finish to
keep the “shine” factor down for a stealthier appearance, plus it’s going to
get beat to hell anyways so why bother. Next make your pilot hole for your
leash anchor on one end, in this case a large wood screw and a washer. Thread
the wood screw though the middle of the 5/16 shock cord until the screw point
protrudes out to the other side. Now insert the screw into the pilot hole that
has been filled with Goop brand marine glue and tighten it until flush. Clip
off the tag end of the shock cord with a pair of dikes flush so the grip slides
on smoothly.
.jpg)
With the mountain bike grip, ream the end hole out with a
5/16 bit to allow the shock cord to pass through. Laying the grip in the hot
sun on some black asphalt will soften the grip for easier application. Once the
grip is soft, shoot the inside with some carburetor cleaner to help aid in
sliding the grip on. The carb cleaner will eventually evaporate and the grip
will be locked in place. This step does require a bit of muscle! Measure how
long you would like your leash and make an overhand loop knot, tighten this very
well until it’s seated. I opted for a flat black locking carabiner which will
run you another $9, you can get away with much less but I wanted “bombproof”
technology with a little insurance.

For the tip I then glued on a 1” vinyl leg protector for
furniture with the Goop marine glue. Your next step will be removing just the
bottom vinyl section of the leg protector so that the wood dowel is exposed. This
will provide enough grip for wading and it wears in nicely, it’s also so much
quieter than a metal tip; which the trout can appreciate. Using a Surform hand
held planer will speed up removing the bottom material quickly. Finish off with
a palm sander until flush and smooth.
That’s it! You’re ready to rock the canyon water!

No comments:
Post a Comment